How To Make A Paper Airplane
These instructions were prepared as an assignment for a class called "Business and Technical Communications." If you have any questions about them you may send me e-mail at:
james@jdcard.com (mailto://james@jdcard.com)
Fans! Received a note from Christine W.:
"Wow...Thank you sooo much for this web page! You saved my life to day, my 4 yr. old was mad at me because I couldn't make paper airplanes like daddy. Now I can make BETTER paper airplanes. ;} Thanks for helping with the little things in life. Christine"
MATERIALS NEEDED:
1. One sheet of paper. Common notebook paper or stationery should work quite well.
The paper used must be rectangular in shape with straight, smooth edges and square (90°) corners. In order to provide the necessary stiffness and ease of folding the paper's weight should be at least 18 pound but not more than 28 pound paper. The size of the paper is less important than the features already discussed. It may range from about 4x6 inches to about 11x14 inches (lighter weight paper is more suitable for smaller sheet sizes).
The "weight" of paper offers an approximation of how thick and how stiff each sheet is. The term actually refers to the weight of a stack of 500 sheets of paper (of a certain size, which I have forgotten; possibly 17x22 inches?).
2. A smooth, flat work surface.
The work surface should be at least as large as the sheet of paper and offer a firm, stable surface to support the paper while it is being folded.
3. OPTIONAL: One pair of scissors or paper shears.
PROCEDURE:
Step 1
Fold the paper in half lengthwise. Crease this fold well, then reverse it (open up the folded page and fold it along the same line in the opposite direction; in other words, turn it inside out) and crease again.
This fold is the foundation of all that follows and it is important that it is done properly. Ensure that the long edges of the paper are carefully aligned so that they are flush with one another over their whole length before creasing the fold.
Figure 1 - First Fold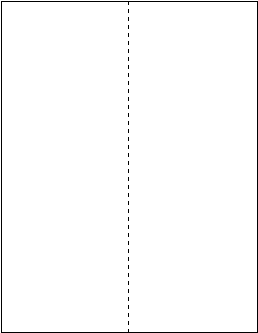
Step 2
Fold down the top left corner until the top edge of the left half of the page is aligned with the first fold.
Figure 2 - Fold Down Upper Left Corner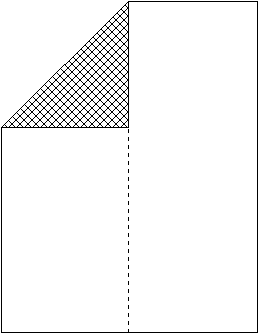
Step 3
Fold down the top right corner until the top edge of the right half of the paper is aligned with the first fold.
Figure 3 - Fold Down Top Right Corner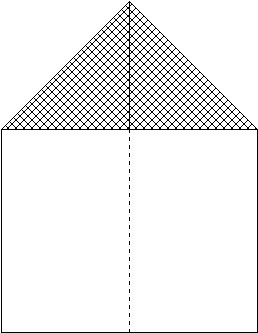
Step 4
Fold the point down. Steps two and three form a "point" at the top of the page. Fold this point down (toward you) so that the flaps formed in steps two and three are on the inside of the fold. Make the fold as high up on the page as possible without folding or crushing the flaps which are on the inside of this fold.
Figure 4 - Fold Point Down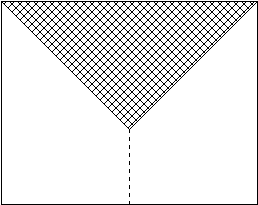
Step 5
Fold in half lengthwise (along the original fold from step 1) towards the back so that the folded-down point is on the outside of the fold.
Figure 5 - Fold In Half Toward Back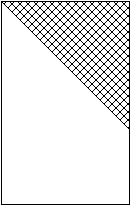
Step 6
Tear or cut a notch in the upper corners. If you have scissors available they will provide an easier and more attractive way to make the notches. Remove a square (about ½ inch) from the outer corners. Make sure you do not cut your notch along the center fold.
Figure 6 - Notch The Upper Corners
Step 7
Open the fold from step five so that the point is again on top and pointed toward the bottom of the page. The notched corners will be at the top of the page.
Figure 7 - Open Fold To Expose Point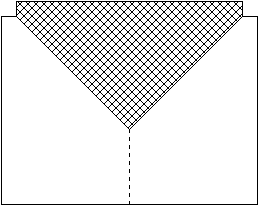
Step 8
Fold down the top left corner so that the top edge of the left half of the page is aligned with the center fold. This step is very similar to step two.
Figure 8 - Fold Upper Left Corner Down To Center-Fold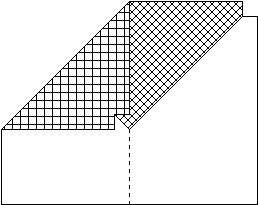
Step 9
Fold down the top right corner so that the top edge of the right half of the page is aligned with the center fold. This step is very similar to step three.
Figure 9 - Fold Upper Right Corner Down To Center-Fold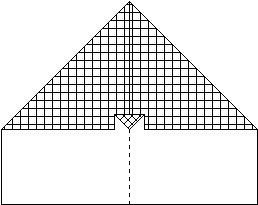
Step 10
Fold up the tip of the point to hold the flaps in place. Steps eight and nine created two "flaps" which expose the tip of the point (which was created in steps three and four) through the notches created in step six. Fold the exposed tip of the point up so that it covers the edges of the two flaps. This will hold those flaps in the proper position during flight.
Figure 10 - Fold Tip Of Point Up Over Two Notched Flaps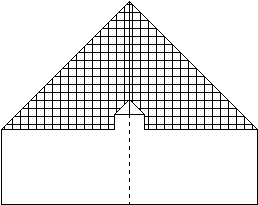
Step 11
Fold the right side of the page back along the center fold so the the flaps and point are exposed on the outside. This creates two panels folded back-to-back along the center fold, with the notches and upturned point on the outside of the fold and the inside faces of the panels being smooth.
Figure 11 - Fold Back Along Center Fold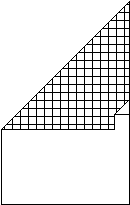
Step 12
Rotate the page clockwise 90° so that the angled portion is to the right and the square end is to the left.
Fold down the right wing. This fold lifts just the top panel created in step 11 and folds it "in half" so that the angled upper edge of the panel is parallel to and even with the original center fold (now at the bottom of the page).
Figure 12 - Rotate Clockwise, Fold Down Right Wing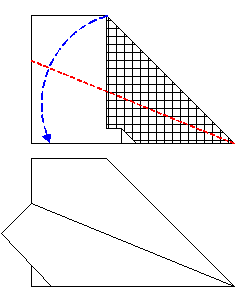
Step 13
Flip the page over, left to right so that the fold created in step 12 is down against the work surface and the angled edge is at the top and left and the square end (now possibly with the protruding tail of the wing created in step 12, depending upon the length-to-width proportions of the original sheet of paper) is to the right.
Fold down the left wing. This fold is a mirror image of the one just completed in step 12. The angled edge is folded down so that it is parallel to and even with the original center fold.
Figure 13 - Turn Over, Fold Down Left Wing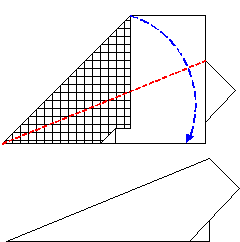
Finished Plane
The plane is now finished and ready to fly!
Here is a side view and a top view of the plane after step 13 is completed and the plane is allowed to "open up" naturally.
Figure 14 - Side And Top Views Of Finished Plane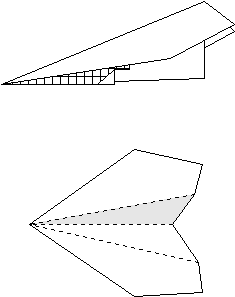
OPERATING INSTRUCTIONS:
The original assignment was to write instructions for "how to make a paper airplane," but now that you've gone to the trouble of making one it might be useful to have some instructions regarding how to operate it. As mentioned above, the finished plane tends to "open up" a bit when it is released. In order to launch the plane you must get the plane back to its fully folded position as it was at the completion of step 13. Then, allowing the two wings to open upward until their two smooth top surfaces are parallel to each other, grasp the base of the plane between your thumb and forefinger at about the center point along the length of the first center fold. If you used an 8½x11 inch page this will probably be about where the turned-up tip of the point holds the wing flaps in place. This grip will hold the center of the plane together so that the plane will have a "T" shape when viewed head-on from the tip - the wings will be flat and level with the ground and the central base of the plane will extend downward perpendicular to the wings.
CAUTION: Never launch your plane (or any other object) toward a person or animal, or even fragile objects. Although it is just a single sheet of paper and may seem relatively harmless a paper airplane could damage a person's eye or cause other painful injuries.
To launch the plane select an area with few obstructions, either indoors or outdoors (unless it is very windy). An especially nice place to launch paper planes from is a second- or third-floor balcony - if you don't mind going down and up the stairs to retrieve the plane after each flight. The plane should be launched, point-first (with the narrow, pointed tip toward the front; the direction of travel will be approximately parallel with the original center fold of the plane which is now at its bottom), at a medium speed (it does not perform well when thrown very hard or fast) at a level or slightly upward trajectory.
You may experiment with folding the tips of the wings slightly upward or downward or with cutting the tail of the plane off entirely a short distance behind the folded-up tip of the point on its base. It will still perform fairly well after a number of these modifications, but I find that I am most pleased with its performance when folded just as described in the 13 steps above.
Figure 15 - Ready To Fly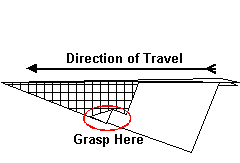
© Copyright 1998 - James Card.
©2022 🅭🅯🄏🄎 Attribution-NonCommercial-ShareAlike 4.0 International (CC BY-NC-SA 4.0)
⋯
🗡️ spartan://jdcard.com:3300/ (spartan://jdcard.com:3300/)
